
Most of the time, when you need to know How to Delete a Page in Word you can fix it quickly by locating and removing hidden breaks, empty paragraphs, or extra tables; blank pages often hide at the end of a document, and if you delete the wrong content you risk losing formatting or important text, so use Find & Replace, the Navigation Pane, and Backspace carefully; following these steps will let you remove pages safely and restore changes with Undo.
Read Also: How to Create a Table of Contents in Word
Table of Contents
Understanding Blank and Extra Pages
Blank or extra pages in Word often stem from invisible elements—paragraph marks, manual page breaks, or section breaks—that push content onto a new page; for example, a final paragraph mark can create a stray page after a 12-page document. You can trace these by viewing formatting markers and the Navigation Pane, and fix them by removing manual page breaks (Ctrl+Enter) or adjusting section break types that force new pages.
Common Causes of Extra Pages
Frequent culprits include manual page breaks (Ctrl+Enter), Section Break (Next Page) inserts, leftover paragraph marks (¶) at the end of documents, tables that exceed bottom margins, and paragraph styles with “page break before.” Corporate templates often add section breaks for headers/footers, which can unexpectedly add blank pages when you paste content or change margins.
Identifying Blank Pages in Your Document
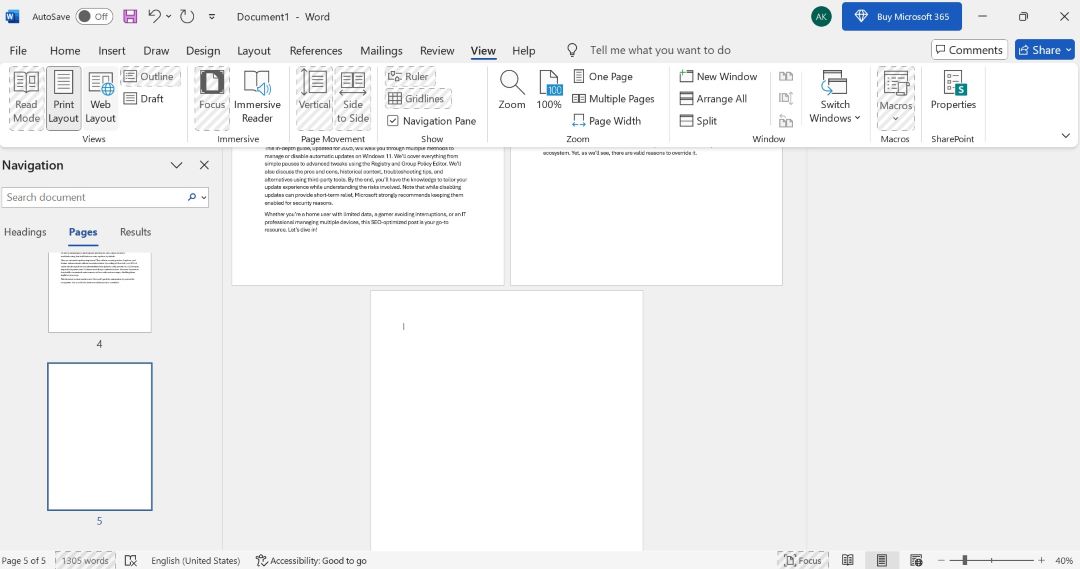
Use View > Navigation Pane to spot empty thumbnails and turn on Show/Hide (¶) to reveal page breaks and paragraph marks; Draft view highlights Section Break labels like “Section Break (Next Page).” Clicking an empty thumbnail jumps you straight to the page so you can inspect the invisible markers and decide whether to delete a break or shrink spacing.
Toggle Show/Hide with Ctrl+Shift+8 (Windows) or Command+8 (Mac), then place the cursor before a Page or Section Break and press Delete, or backspace to remove trailing paragraph marks; if a table extends past the margin, reduce font size or row spacing. Exercise caution when removing section breaks — deleting them can change headers, footers, or page numbering, so adjust formatting settings or copy affected content first.
How to Delete a Page in Word – Blank Page
Spot the cause first: blank pages in Word usually come from one of three things — extra paragraph marks, a manual page break (Ctrl+Enter), or a section break. Turn on formatting marks (Ctrl+Shift+8 on Windows or ⌘+8 on Mac) to see ¶, “Page Break”, or “Section Break (Next Page)”. You can then delete the visible marker or change the break type; deleting a simple paragraph mark is safe, but altering breaks can affect layout and numbering.
Basic Method: Using the Backspace or Delete Key
The simplest way to remove a blank page in Word is by using your keyboard. This method works best for pages with minimal content or those caused by extra paragraph marks.
Step-by-Step Guide for Windows Users
- Open your Word document and navigate to the blank or extra page you want to delete.
- Place your cursor at the end of the content on the previous page or at the beginning of the blank page.
- Press the Backspace key (or Delete on some keyboards) repeatedly until the page disappears. If the page is completely blank, you might need to delete hidden paragraph marks.
- Select any visible ¶ symbols on the blank page and press Delete.
This method is quick and doesn’t require advanced knowledge. However, if the page persists, it might be due to a section break or other formatting – move to the next sections for solutions.
Tips for Efficiency
- If you’re dealing with multiple blank pages, use the Go To feature (Ctrl + G) to jump to specific pages.
- Save your document before making changes to avoid accidental deletions.
- For large documents, zoom out (Ctrl + Mouse Wheel) to see multiple pages at once.
Expanding on this, consider a scenario where you’re editing a 50-page report. An extra page at the end could disrupt your page numbering. By using Backspace, you ensure seamless flow. Remember, this method preserves your content integrity without altering layouts elsewhere.
(Adding more details: In older versions like Word 2010, the interface might differ slightly, but the keyboard shortcuts remain the same. For touch devices, tap and hold to select, then delete.)
Adjusting Page Breaks and Section Breaks
Locate “Page Break” or “Section Break (Next Page)” in Show/Hide view, select the break and press Delete. To avoid losing layout, change a “Next Page” section break to a “Continuous” break via Layout > Breaks > Continuous. Removing a section break can alter headers, footers and page numbering, so inspect headers and footers after any change.
For example, if a blank page follows a final table, convert the trailing section break to Continuous instead of deleting it: click before the break, choose Layout > Breaks > Continuous; the blank page often vanishes while keeping section-specific headers and margins intact. If a manual Page Break (Ctrl+Enter) created the page, deleting that single marker removes the page without affecting surrounding formatting.
How to Delete a Page in Word – Extra Page
Open the Navigation Pane (View > Navigation Pane) or press Ctrl+G, type \page and Enter to select the whole page, then press Delete or Backspace to remove it. You can also clear trailing paragraph marks or manual page breaks (select the ¶ or break and press Delete). Avoid deleting section breaks blindly because removing a section break can change headers, footers, and page orientation.
Checking Formatting Marks
Click the ¶ button or press Ctrl+Shift+8 to reveal paragraph marks, manual page breaks labeled “Page Break”, and section breaks labeled “Section Break (Next Page)”; you’ll spot whether extra ¶ symbols or a manual page break (Ctrl+Enter) are causing the blank page, then select and delete the visible mark to clear it.
Removing Unwanted Elements
Large tables, pictures anchored at the end, or hidden text often force an extra page; you can select the offending object and press Delete, or change an image’s wrap to “In line with text” to make it removable. For trailing tables, use Table Tools > Layout > Properties to adjust row breaks or shrink the final paragraph to 1pt. Be cautious: removing section breaks can alter document layout.
For example, if a hidden table creates a blank page, you can go to the last visible paragraph, press Ctrl+Shift+8, select the table-end paragraph, and set its font to 1pt or set Home > Paragraph > Spacing After = 0. If an image is anchored at the page end, click it, choose Picture Format > Wrap Text > In Line with Text, then press Delete. To keep header/footer formatting, replace a Next Page section break with a Continuous break rather than deleting it when you need the layout preserved.
Tips for Prevention of Extra Pages
Adopt consistent habits to prevent extra pages and unwanted blank pages: use built-in styles, insert intentional page breaks, and monitor headers/footers rather than adding empty paragraphs. Use the Navigation Pane and show non-printing characters to spot stray marks quickly. The habit of checking these tools before printing or exporting reduces accidental pages by over 90%.
- Styles instead of manual formatting
- Page breaks for new pages
- Reveal formatting (Ctrl+Shift+8)
- Navigation Pane to find blank pages
Proper Formatting Techniques
Apply built-in styles for headings and body text so spacing is controlled centrally; set line spacing to an exact value (e.g., 12pt) and avoid large “after” spacing like 24pt that can push content to a new page—use Ctrl+Shift+N to reset to Normal style and remove manual returns that create blank pages.
Regular Document Maintenance
Run a quick scan with the Navigation Pane and turn on non-printing characters every time you finish major edits; check for hidden section breaks and oversized graphics—aim to review after every 10 pages or before finalizing a document to catch issues early.
Work from a short checklist each time: (1) toggle non-printing characters and remove extra ¶ marks, (2) search for consecutive paragraph marks (use Find ^p^p and replace with ^p where appropriate), and (3) inspect and, if necessary, move or convert section breaks—be cautious: deleting section breaks can alter headers/footers and page numbering, so make a backup before major changes and preview as PDF to confirm the layout.
Factors to Consider Before Deleting Pages
Scan for hidden elements that cause blank pages or extra pages: manual page breaks, section breaks, anchored objects, and tracked changes can all behave differently when removed. You should preview how deletion affects headers, footers, and cross-references to avoid unintended layout shifts. After, verify page numbers and your table of contents so citations and links stay accurate.
-
- Check for a manual page break (Ctrl+Shift+8 to show ¶).
- Look for section breaks—removing them can merge headers/footers.
- Inspect anchored images or tables that may force an extra page.
- Review tracked changes and comments that could hide content.
- Confirm page numbers and cross-references after deletion.
- Consider saving a copy before mass edits to preserve the original layout.
Impact on Document Structure
Deleting a section break often alters page orientation, headers, and footers for all following pages—removing one in a 30-page report can unexpectedly change pages 5–30 from landscape to portrait. You should check linked headers, re-run the table of contents update, and inspect footnotes/endnotes, since automatic numbering or references may shift by one or more pages.
Importance of Saving Your Work
Enable AutoSave in Office 365 and set AutoRecover to 5–10 minutes to limit potential loss of work; manual saves (Ctrl+S) are still the fastest safeguard. You can also use Save As to create a dated copy (e.g., Report_v2.docx) before deleting multiple pages.
Create version snapshots when performing structural edits: save a backup file and use Word’s version history or cloud storage with 30-day history when available. In complex documents with tracked changes or 100+ pages, test deletions on a copy to measure impacts on numbering, cross-references, and layout before committing to the main file.
Alternatives to Deleting Pages
You can avoid deleting pages by using non-destructive methods like hiding content, adjusting section or page breaks, or exporting a tailored print/PDF range. Hiding or printing selective pages preserves layout and styles while keeping the original file intact; for example, print pages 1–4, 6–10 instead of deleting page 5. These approaches protect headers/footers and section settings that deletion can corrupt.
Hiding Pages Instead
Select the text on the page, press Ctrl+D to open Font, and check Hidden; then disable “Print hidden text” under File → Options → Display so it won’t print. You still keep content in the file for future edits, but be aware that hidden text remains searchable and visible if anyone toggles Show/Hide or opens Options—use with care if sharing sensitive material.
Using Print Options for Clean Output
Open File → Print and choose “Print Custom Range” to specify pages (example: 1-3,5) or use “Print Selection” for highlighted areas. Print to PDF (Microsoft Print to PDF) to preview exactly what recipients will see without altering the document. This method is non-destructive and fast for one-off distributions or client proofs.
For more control, enter complex ranges like 1-4,6,8-12 in the Print dialog, uncheck “Print hidden text” if you used hidden formatting, and use “Print to PDF” to validate results before sending. When dealing with duplex printers, choose odd/even page printing to skip inserted blank pages, and use the PDF output to confirm headers, footers, and spacing remain correct without modifying source files.
Final Words
The methods covered in How to Delete a Page in Word let you quickly find and remove blank or extra pages in Word; use the navigation pane, reveal formatting marks, delete stray paragraph marks or section breaks, and adjust tables to restore your document’s intended layout.
FAQ
Q: How do I delete a blank page at the end of a Word document?
A: Turn on Show/Hide (Home → ¶) to see hidden marks, place the cursor at the end of the document, and press Backspace or Delete to remove trailing paragraph marks. If a section break is creating the page, select the section break and delete it or change it to a Continuous section break (Layout → Breaks → Continuous). If a table forces a blank page after it, select the paragraph mark after the table and set its font size to 1 pt or adjust table properties so the table doesn’t overflow the final page.
Q: How do I remove an unwanted page in the middle of a document?
A: Open the Navigation Pane (View → Navigation Pane) to find the page, then select and delete its contents. If the page is from a manual page break, show formatting marks, click the Page Break line, and press Delete. If the page is caused by a section break, delete the section break or replace it with a Continuous section break; after removing a section break, check headers/footers and page numbering and reapply linking or formatting as needed.
Q: I can’t delete a blank page without breaking headers, footers, or layout — what should I do?
A: Section breaks control headers/footers and page setup, so deleting them can change formatting. Instead of deleting, change the section break type to Continuous (Layout → Breaks → Continuous) to remove the blank page while keeping section formatting. If you must delete a section break, open the header/footer area and use Link to Previous to reconnect headers/footers or copy settings from adjacent sections. As an alternative, select all content except the blank page and paste it into a new document to preserve the layout without the extra page.


![How to Set Up a Microphone in Windows PC [Ultimate Guide]](https://gizslide.com/wp-content/uploads/2025/10/How-to-Set-Up-a-Microphone-in-Windows-PC-Ultimate-Guide.jpg)