In the ever-evolving world of operating systems, Windows 11 continues to dominate as Microsoft’s flagship OS, offering sleek interfaces, enhanced security, and seamless integration with productivity tools. However, one feature that often frustrates users is the automatic Windows updates. These updates, designed to keep your system secure and up-to-date, can sometimes disrupt workflows, consume bandwidth, or even cause compatibility issues with software and hardware. If you’ve ever wondered how to disable automatic Windows update settings, you’re not alone. Searches like “turn off Windows auto updates,” “stop Windows 11 automatic updates,” and “disable Windows updates permanently” are common among users seeking more control over their devices.
This in-depth guide, updated for 2025, will walk you through multiple methods to manage or disable automatic updates on Windows 11. We’ll cover everything from simple pauses to advanced tweaks using the Registry and Group Policy Editor. We’ll also discuss the pros and cons, historical context, troubleshooting tips, and alternatives using third-party tools. By the end, you’ll have the knowledge to tailor your update experience while understanding the risks involved. Note that while disabling updates can provide short-term relief, Microsoft strongly recommends keeping them enabled for security reasons.
Whether you’re a home user with limited data, a gamer avoiding interruptions, or an IT professional managing multiple devices, this SEO-optimized post is your go-to resource. Let’s dive in!
Table of Contents
The History of Windows Updates: From Manual Patches to Automatic Enforcement
To appreciate why automatic updates exist, it’s essential to look back at the evolution of Windows updates. Microsoft’s journey with system updates began in the 1990s with Windows 95, where users had to manually download patches from bulletin boards or CDs. This era was plagued by vulnerabilities, as many users neglected updates, leading to widespread exploits like the infamous Code Red worm in 2001 that targeted unpatched Windows NT and 2000 systems.
In 2003, Microsoft introduced Windows Update as a centralized service with Windows XP Service Pack 1, allowing automatic downloads but still requiring user approval for installation. The real shift came with Windows Vista in 2006, where automatic updates became more aggressive to combat rising cyber threats. By Windows 7 (2009), users could choose from options like “Install updates automatically” or “Download but let me choose whether to install.”
Windows 8 (2012) and Windows 10 (2015) marked a turning point. Microsoft made updates mandatory for home users, citing security as paramount. Automatic updates ensured patches for critical vulnerabilities, such as those exploited in ransomware attacks like WannaCry in 2017, which affected over 200,000 computers worldwide due to unpatched systems. Windows 11, released in 2021 and refined through 2025, builds on this by integrating AI-driven update predictions and Copilot-assisted troubleshooting, but it still enforces auto-updates by default.
Why are automatic updates important? They deliver security patches, bug fixes, and feature enhancements without user intervention. According to Microsoft, over 90% of cyber attacks exploit known vulnerabilities that updates could prevent. In a 2024 report, unpatched systems were 2.5 times more likely to suffer breaches. However, for users in bandwidth-constrained environments or those with custom setups, disabling them might be necessary.
This historical context underscores Microsoft’s push for automation: to protect the ecosystem. Yet, as we’ll see, there are valid reasons to override it.
Read Also: How to Change the Display Language in Windows 10/11
Pros and Cons of Disabling Automatic Windows Updates
Before proceeding, weigh the benefits and drawbacks. Disabling automatic updates isn’t recommended by Microsoft, but it can be useful in specific scenarios.
Pros:
- Control Over Timing: Prevent unexpected restarts during critical work, gaming sessions, or presentations. For instance, updates have been known to interrupt live streams or remote work.
- Bandwidth Savings: Ideal for metered connections or regions with expensive data plans. Automatic downloads can consume gigabytes monthly.
- Avoid Unwanted Changes: Some updates introduce features or UI tweaks that break compatibility with older software or hardware.
- Performance Boost: On older machines, skipping non-essential updates can reduce resource usage, as updates sometimes increase CPU/disk load.
- Customization for Power Users: IT admins or developers can test updates manually before deployment.
Cons:
- Security Risks: Without patches, your system is vulnerable to malware, exploits, and zero-day attacks. Historical events like the EternalBlue exploit in 2017 highlight this danger.
- System Instability: Missing bug fixes can lead to crashes, blue screens, or performance degradation over time.
- Feature Gaps: You’ll miss out on new functionalities, such as Windows 11’s AI enhancements or enhanced Copilot integration.
- Compliance Issues: In enterprise settings, disabling updates might violate security policies or warranties.
- Re-enablement Challenges: Windows may automatically re-enable updates after major version updates or resets, requiring repeated manual adjustments.
In summary, disable only if necessary, and periodically check for manual updates. Microsoft advises against permanent disabling, emphasizing that “automatic updates are critical to security and ecosystem health.”
Method 1: Pause Updates Temporarily via Settings (Easiest for Beginners)
The simplest way to halt automatic updates is by pausing them through Windows Settings. This isn’t a permanent disable but allows up to 5 weeks of respite, renewable. It’s Microsoft-approved and reversible.
Step-by-Step Guide:
- Open Settings by pressing Windows + I.
- Navigate to Windows Update (or search for it).
- Under “Update status,” click Pause for 1 week (extendable via Advanced options up to 5 weeks).

This method is ideal for short-term needs, like travel or deadlines. However, updates will resume automatically afterward. For longer control, explore advanced options.
Pros: No technical skills required; doesn’t void warranty. Cons: Temporary; security risks during pause.
In 2025, Windows 11’s AI suggests pause durations based on usage patterns, but you can override them.
Method 2: Set Your Connection as Metered
Windows treats metered connections (like mobile hotspots) gently, limiting automatic downloads to essential security patches. This semi-disables non-critical updates.
Step-by-Step Guide:
- Go to Settings > Network & Internet > Wi-Fi (or Ethernet).
- Select your network > Properties.
- Toggle Set as metered connection to On.

This works for both Wi-Fi and Ethernet in Windows 11. It’s great for data caps but may still allow some updates.
Pros: Easy; preserves security essentials. Cons: Not a full disable; ineffective on unlimited connections.
Tip: If using a VPN, set the underlying connection as metered.
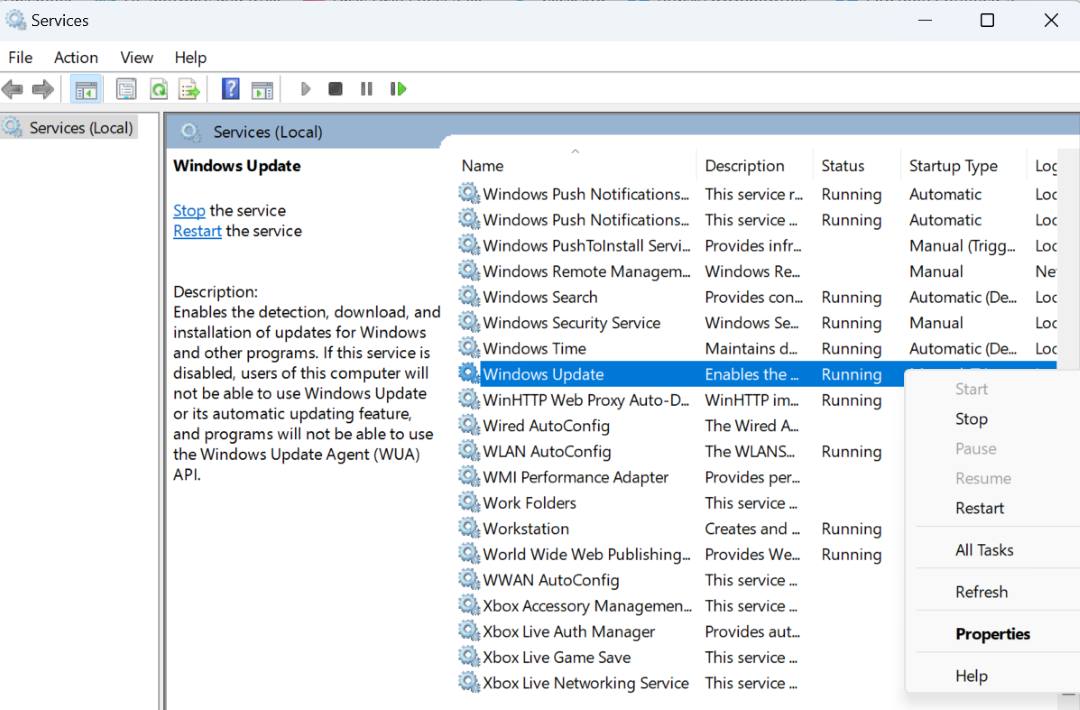
Method 3: Disable Windows Update Service via Services.msc
For a more permanent solution, stop the Windows Update service. This prevents automatic checks and downloads.
Step-by-Step Guide:
- Press Windows + R, type services.msc, and hit Enter.
- Scroll to Windows Update.
- Right-click > Properties.
- Set Startup type to Disabled.
- Click Stop if it’s running, then Apply > OK.
Restart your PC to confirm. To re-enable, set it to Automatic and start the service.
Pros: Effective for all editions; quick. Cons: May break other features like Microsoft Store updates; Windows might re-enable it.
Warning: This exposes your system to risks, so use it cautiously.
Method 4: Use Group Policy Editor (For Pro/Enterprise Editions)
Group Policy offers granular control, allowing you to configure updates to notify only or disable auto-installs.
Step-by-Step Guide:
- Press Windows + R, type gpedit.msc, and Enter.
- Navigate to Computer Configuration > Administrative Templates > Windows Components > Windows Update > Manage end user experience.
- Double-click Configure Automatic Updates.
- Set to Enabled, then choose option 2: Notify for download and auto install.
- Apply > OK.
For full disable, set to Disabled or use option 5 for manual control.
Pros: Precise; enterprise-friendly. Cons: Not available in Home edition; requires admin rights.
If you have Home, skip to Registry method.
Method 5: Edit the Registry (Advanced Users Only)
Registry edits provide deep control but carry risks—back up first!
Step-by-Step Guide:
- Press Windows + R, type regedit, and Enter.
- Navigate to HKEY_LOCAL_MACHINE\SOFTWARE\Policies\Microsoft\Windows\WindowsUpdate\AU.
- If AU doesn’t exist, create it (right-click > New > Key).
- Right-click AU > New > DWORD (32-bit) Value, name it NoAutoUpdate.
- Set Value data to 1, Base Hexadecimal.
- Restart.
To undo, set to 0 or delete the key.
Pros: Works on all editions; permanent until changed. Cons: Risk of system instability if done wrong.
Always export the key before editing.
Method 6: Disable Update Tasks in Task Scheduler
Windows schedules update tasks; disabling them adds another layer.
Step-by-Step Guide:
- Search for Task Scheduler.
- Navigate to Task Scheduler Library > Microsoft > Windows > WindowsUpdate.
- Right-click tasks like Scheduled Start, disable them.
Pros: Targets specific behaviors. Cons: Tasks may reappear after restarts.
Troubleshooting Common Issues When Disabling Updates
If updates persist despite your efforts, try these fixes:
- Updates Re-enable Automatically: Windows has a “medic” service (wuauserv) that restarts disabled services. Use Group Policy to override or run sc config wuauserv start= disabled in Admin Command Prompt.
- Error Messages: If Services.msc denies access, run as admin or check antivirus interference.
- Can’t Find gpedit.msc: Home users need third-party installers or Registry alternatives.
- System Slowdown After Disable: Ironically, missing updates can cause issues—run the Windows Update Troubleshooter (Settings > System > Troubleshoot > Other troubleshooters > Windows Update).
- Updates Stuck: Clear the update cache by stopping services, deleting C:\Windows\SoftwareDistribution, then restarting.
If problems persist, reset Windows Update components via Microsoft’s tool.
Alternatives: Third-Party Tools for Managing Updates
If built-in methods aren’t enough, consider these tools:
- BatchPatch: Automates updates across networks, with scheduling and reporting.
- Patch My PC: Focuses on third-party app updates alongside Windows, free for home use.
- Automox: Cloud-based, handles cross-platform patching.
- ManageEngine Patch Manager Plus: Enterprise-level, with vulnerability scanning.
- Windows Autopatch: Microsoft’s own service for automated management in businesses.
These tools offer more flexibility than native options, often with free trials.
Comparisons: Disabling Updates in Windows 10 vs. Windows 11
Windows 10 allowed easier disables via Settings, but Windows 11 tightens controls for security. In 10, you could defer updates indefinitely; in 11, the max pause is 5 weeks. Group Policy remains similar, but 11’s AI may suggest re-enabling. For legacy users, methods are backward-compatible.
| Feature | Windows 10 | Windows 11 |
|---|---|---|
| Pause Duration | Up to 35 days | Up to 5 weeks |
| Metered Connection | Limits downloads | Same, but smarter detection |
| Service Disable | Effective | May auto-restart |
| Group Policy Options | Basic | Enhanced with AI |
FAQs on Disabling Automatic Windows Updates
Q: Is it safe to disable updates permanently? A: No, it increases vulnerability risks. Only disable temporarily.
Q: Will disabling affect Microsoft Office? A: Possibly; Office updates tie into Windows Update.
Q: How to manually install updates after disabling? A: Go to Settings > Windows Update > Check for updates.
Q: What if I’m on Windows 11 Home? A: Use Services, Registry, or metered methods.
Q: Can updates be scheduled instead? A: Yes, via Active Hours in Settings > Windows Update > Advanced options.
Conclusion: Balance Control and Security
Disabling automatic Windows update settings gives you power over your PC, but it’s a double-edged sword. Use the methods above wisely—pause for convenience, disable services for persistence, or leverage tools for automation. Remember, in 2025’s threat landscape, staying updated is crucial. If possible, opt for manual checks weekly.
For more tech guides, check our blog on optimizing Windows 11 performance or securing your device. Stay safe online!